Friday, October 29, 2010

Sunday Olive Knolls Trunk or Treat

 This Sunday, October 31st 
Join my Family for some fun at Olive Knolls' Trunk or Treat! Always a lot of fun and the kids actually get to enjoy all the air up activities! There is food available to purchase, our MOPS group will have the cotton candy for sale- $2.00 (stop by and say "Hi" to our Mentor Moms). The kids can do the "Trunk or Treat" and load up on candy!

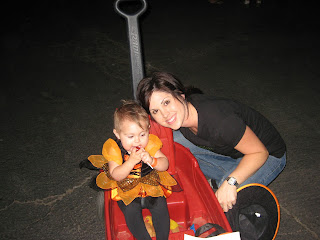
Here are a few pictures of my family over the years at Olive Knolls' Trunk or Treat.

WARNING, every Halloween we buy Hunter a new costume and then at the last moment he wants to wear the costume again from the previous year. So you will see duplicate costumes!!!

The first pictures are from 2007 at Olive Knolls' Trunk or Treat. My kids were so little, Hunter was 2 1/2 and Taylor was 3 months.

 That year one of the Trunk or Treat booths served popcorn and played the movie Cars.
 2008
 Hunter is his Mr. Incredible outfit...again


 2009


Thursday, October 28, 2010

Lacey's Chili recipe

Lacey's Chili was so delicious! Here is her recipe:

Lacey's Easy Crockpot Chili

Ingredients:

  • 2 pounds coarsely ground beef round or chuck
  • 1 cup chopped onion
  • 2 (15 oz.) cans red kidney beans, drained
  • 2 (14 1/2 oz.) cans tomatoes, drained
  • 1 (14 1/2 oz.) can red beans
  • 1 (14 1/2 oz.) black beans
  • 1 green pepper, seeded and coarsely chopped
  • 2-3 cloves garlic, peeled and crushed
  • 2 to 3 tbsp. chili powder
  • 1-2 tsp. black pepper
  • 1-2 tsp. ground cumin
  • salt, to taste

Preparation:

In a large skillet, brown ground beef with the chopped onion. Put the ground beef, onions, and other ingredients in a 3 1/2 to 5-quart slow cooker. Stir well. Cover and cook on low for 9 to 11 hours. Serves 8-10

Wednesday, October 27, 2010

Recipes

RECIPE TIME

Yesterday at MOPS we had a beautiful spooky table with delicious food! We are still gathering some of the recipes but here are a couple to get you started.

Enjoy!


Rebecca Rossini's Meatballs
They are super easy! 
Just frozen meatballs (usually from Trader Joes), add 1 jar of Heinz chili sauce and 1 jar of grape jelly. Cook in crock pot on low for about 4 hrs.


Lynn's Snicker Caramel Salad

 ·  1 (8 ounce) package cream cheese, softened
·  1 cup powdered sugar
·  1 (12 ounce) container Cool Whip, thawed
·  6 Snickers candy bars
·  Mix cream cheese and powdered sugar until thoroughly blended.
·  Fold in Cool Whip.
·   Cut Snickers into bite size chunks and add to cream cheese mixture.
·   Chop the apples into chunks and stir.
·   Chill 1 hour before serving
Chilling for a long period of time (such as overnight) will result in liquid being released from the salad.

Yummy! 
I used a bagfull of fun sized bars and four apples for 1 recipe.
I add some chocolate curls as decorative garnish.
(For MOPS I doubled the recipe)

 Lynn's Pecan Salad
Spinach leaves
Crumbled gorgonzola cheese
Candied pecans (WinCo's Bulk section)
Strawberry raisons (WinCo's Bulk section) 
Mix together and add Girrard's Raspberry dressing  

Tuesday, October 19, 2010

The Post it Note Project

Author Kathi Lipp has a few books out and I have one of them called: "The Husband Project". I picked it up at the pharmacy or car wash one day (you know those book racks that you see at those places-I'm always a sucker). But this time I thought this one was pretty interesting...Check out what the back of the book said and answer the questions honestly...I will admit I said yes to a few.

"It's about love. It's about respect. It's about letting your husband know you still think he's hot!"

It goes on to say:

"Have you and your husband gone from over-the-top romantics to tolerant roommates?

Do you dress up more to go out to dinner with your girlfriends than you do to go out with your husband?

Have you forgotten the fine art of flirting with your guy?

Maybe it's time to put your husband on Project Status.

In the Husband Project, Kathi Lipp shows you how even in the midst of your busy schedule, you can take your marriage from ordinary to amazing in just 21 says. Through simple daily action plans, you'll discover fun and creative ways to bring back that lovin' feeling...and to remind you and your guy why you got married in the first place.

So rise to the challenge that women across the US have taken: Three weeks of putting your husband before kids, housework, jobs... and even shopping."

Take a look at this little project that you can work on now!
This is from her blog. Click here to check out more from Kathi Lipp.
If you’ve heard me speak on the subject of The Husband Project, you know I love the post it note project.
All I’m asking you to do today is to write a post it note and post it somewhere that your husband will see it. It can be something encouraging, it can be something flirty.
Here are some examples of what you could write:

Crib Notes: 21 Post-It-Sized Encouragements
1.      I’m praying for you today.
2.      Those jeans are really working for you…
3.      I love you.
4.      You are the best dad!
5.      You’re the kind of husband that makes the other wives jealous.
6.      You rock my world!
7.      Can’t wait to see you tonight – meet me upstairs…
8.      Thanks for working hard to provide for us. I appreciate all that you do.
9.      You make me feel beautiful.
10.  I thank God for you everyday.
11.  How did I get so lucky, being married to a guy like you?
12.  You’re great!
13.  You make everyday more fun.
14.  Have a great day.
15.  You’re hot!
16.  I feel so safe with you.
17.  Smart and good looking – I’ve got the whole package in you!
18.  You can be very distracting, you know…
19.  Our kids are so blessed to have a dad like you.
20.  That smile I wear – it is all because of you.
21.  God have blessed me in big ways by letting me be your wife.

Have fun!
Sunday, October 17, 2010

Make Ahead Freezer Smoothies

Check out this great idea from "The Tidy Nest" on making your own Freezer Smoothie Baggies to save you time and money. Below is her instructions.

We have been enjoying smoothies for breakfast this summer.  Smoothies are a quick way to eat a healthy breakfast using fresh ingredients.

We still have a lot of blueberries in our freezer from our trip to the blueberry patch and quite a few strawberries from various summer sales.  

To make these smoothies go together even faster, I divide the fruit and yogurt into serving size baggies and store them in the freezer.  I usually put several of these packets together at the beginning of the month to stock my freezer for the following month. 


The fruit is already washed and chopped and I freeze the yogurt in ice cube trays to divide it into the appropriate serving size.
 
 
For a smoothie that serves two, I use about 1 1/2 cups fruit and 3-4 yogurt cubes (approx. one tablespoon each).  I add the milk or juice into the blender until it reaches a smooth consistency.  


(Photos from The Tidy Nest)
I throw all of the packets into a large freezer bag to prevent freezer burn.

Freezer smoothies make breakfast quick and easy!
 
Check out her blog for some other great ideas! 


Thursday, October 14, 2010

Easy and cherished Halloween Decor


Look at this ADORABLE idea I found over at "The Crafting Chicks". You will have to take some time and check out their blog! They have such great ideas! This particular idea I LOVED because it's something you can put up every year that will make you smile. Take a look below to see "The Crafting Chicks" Tutorial:
________________________________________________________
Ghostly Handprints on Canvas
I LOVE doing kid crafts that involve my girl’s hands.  It is so fun to have something that we can look back and see how they have grown.  I was telling some friends about this fun project I had up my sleeve and they wanted in so we had a fun little party making these cute Ghost handprints.   I have to say it was actually nice to have the extra hands helping too.  With little ones and paint you can never have too many eyes watching. ;)  
Here’s what you’ll need to make your own:
 
Small canvas (I used 6×6, but if you have more kids you could do a longer one with all their hands on one.  I think that would be SUPER cute!)
Black paint
white paint (I used a glossy paint)
glitter
silver pen
I pre-painted the canvas so that I wouldn’t have to worry about doing it with the kiddos around. 

I put some white glossy paint on plate and then painted the kiddos hands and helped them place their hands on the canvas. 
 
Then quickly, sprinkled some glitter over the paint.

Shake off the excess glitter and then find a place for the ghosts eyes and mouth.
On some of the prints, like the one above, there were perfect black spots left open for the mouth.  It was so fun to see the different shapes each hand made and how they each turned out.   

Have Fun!

Tuesday, October 5, 2010

Lead me to the Cross

I Love this song and the way they created this video! Take a look:


Happy Tuesday Everyone!


Sunday, October 3, 2010

How to create rockstar toes at home!

I love cutting corners when it comes to finances. Meaning...I Love thrift shops, yard sales and the goodwill. There's such a satisfying feeling when you score something great at at fraction of the cost! I know I'm a little weird but I am a discount shopping queen. Just ask some of my closest friends. Odds are one piece of my clothing came from the Goodwill or super cheap! That's fun to me!!=)

This is something I do ALL the time! Create "Rockstar" toes at home! 
does a great tutorial. Look below and then check out her blog for some great ideas!

Like Bling for your Feet

Warning: there are about to be feet on my blog.  But I promise they are not my feet.  I feel a little weird about putting pictures of my feet on my blog, it's kind of outside my comfort zone.  So instead of showing you this fun pedicure with my own feet, I'm showing you pictures of cute Hallie's little six year old feet instead.

Have glitter toes been all the rage in the pedicure scene where you live?  They are huge here in Utah.  I kind of thought they seemed fun for little girls, but wasn't sure if I'd like them for myself until Hallie and I had a pedicure day recently.  Now I'm pretty sold, and think they are really fun for the summer season.  The idea behind these is that with the added glitter and gel layer the pedicure will last longer than normal.  We're only on day 2 here, but so far so good.  I'll have to let you know if the homemade version lasts extra long, but even if it doesn't I'm still liking it.

I stopped into Sally's Beauty Supply the other day for some Bobby Pins (I don't like the grocery store variety, they don't hold my hair very well).  Anyway while we were in there Hallie and I decided to get the supplies for glitter toes.  I picked up a new nail polish, fine glitter, and this product called Gelous.  The nail polish was on sale for $2, and I believe the glitter was $0.99 and the Gelous was around $6, so for under $10 Hallie and I are set with pedicure supplies for the summer.  Even if you don't try glitter toes pick up a bottle of the Gelous, it's an awesome, thick top coat.

(pictures from "My Blonde Ambitions")
Okay so this is really simple.  First paint nail polish onto your toes (we did one toe at a time and only needed one coat).  


Then take your glitter and sprinkle it all over the toe.  You want a really thick amount of glitter.  I put some tissue paper under our feet to catch the glitter.  


Then kind of wiggle your toes to get the excess glitter to fall off. 


Then let that dry for just a few minutes and put a coat of the Gelous over top of the glitter.  A little bit of the glitter will come off onto the brush, but not very much, most of it will stay on your toe. 


Voila, glitter toes!  These would be fun in some other colors, but I'm a red pedicure kind of girl. 


 It will take a little while for the excess glitter to wipe off of your toes, it's super fine and kind of sticks to your feet.  But just use a dry q-tip and dust off around your toenail.  I can't wait to try these in some other colors.  Go ahead and try it, I  hope you add some glitter to your summer pedicures!